Thursday, May 29, 2008

IZArc version 3.81 Build 1550


Sometimes you receive emails with zip files, rar files or any other "strange" archive files attached and you are wondering how to open them. Stop looking for solution! IZArc is the right choice. It can unzip (extract) almost any archive file types.

If you have many documents containing confidential information or you just want to back up your files you can use IZArc to create password protected archives secured with strong AES encryption.


    Full Windows Vista compatible!

    IZArc is the ultimate freeware archive utility supporting many archive formats like: 7-ZIP, A, ACE, ARC, ARJ, B64, BH, BIN, BZ2, BZA, C2D, CAB, CDI, CPIO, DEB, ENC, GCA, GZ, GZA, HA, IMG, ISO, JAR, LHA, LIB, LZH, MDF, MBF, MIM, NRG, PAK, PDI, PK3, RAR, RPM, TAR, TAZ, TBZ, TGZ, TZ, UUE, WAR, XXE, YZ1, Z, ZIP, ZOO. With a modern easy-to-use interface, IZArc provides support for most compressed and encoded files, as well as access to many powerful features and tools. It allows you to drag and drop files from and to Windows Explorer, create and extract archives directly in Windows Explorer, create multiple archives spanning disks, creating self-extracting archives, repair damaged zip archives, converting from one archive type to another, view and write comments and many more. IZArc has also build-in multilanguage support.

With IZArc you can open CD image files like ISO, BIN, CDI and NRG. It is also possible to convert such files from one type to another (BIN to ISO, NRG to ISO).

If you need to send large files to your colleagues, friends or customers who may not have archiving tool you can easily create self-extracting archive that can be extracted by simple double click.

IZArc can be configured to run your preferred Anti-Virus scanner when you open any archives.

IZArc supports 256-bit AES encryption to secure your data.

IZArc is integrated in Windows so you can perform all archiving operations by using right-click menus in Windows Explorer.

If you have broken archives IZArc can help you to repair them with ease.

IZArc is 100% virus free and it doesn't contain any spyware or adware.

IZArc is the most complete archive utility available today.


Version 3.81 Build 1550

-Fixed: Zip files and folders with non English names
-Fixed: Split/Merge Zip archives containing non English filenames
-Fixed: Extract CAB SFX archives
-Fixed: Show the amount of extracted files from TGZ archives.
-Updated translations


Version 3.8 Build 1510


-Fixed: Shell context menu under Windows Vista (Now IZArc is 100% Vista (32-bit) compatible)
-Fixed: Confirm File Overwrites when extracting *.tar.gz archives
-Fixed: Compress folders with file names beginning with dot (.test)
-Fixed: Shortcuts working directory when do CheckOut
-Fixed: Modify and update files in subfolders
-Fixed: Drag and Drop folder from an archive to Windows Explorer does not extract subfolders
-Fixed: Extraction process is terminated if some error occurs
-Fixed: Extract multi-volume ARJ archives
-Fixed: Check for update
-Fixed: Zip SFX archive crashes when is unable extracting directory to be created
-Added option to compress/extract archives in background (low process priority)
-Added 7-Zip SFX creation support
-Updated UnRar library
-Some small improvements
-Updated translations


Full post  

Wednesday, May 28, 2008

Adobe Reader 8.1.2 Windows Vista, English

reader_icon_special.jpg
Adobe® Reader® software is the global standard for electronic document sharing. It is the only PDF viewer that can open and interact with all PDF documents. Use Adobe Reader to view, search, digitally sign, verify, print, and collaborate on Adobe PDF files.

Deploy, maintain, and support Adobe Reader across your organization. Corporations, government agencies, and educational institutions can distribute Adobe Reader internally on an intranet site or local network.

Adobe Reader software is available for distribution through physical media: CD, DVD, or bundled with computers. Adobe Reader Enterprise Edition has been developed for easy deployment.

nterested in developing a plug-in for Adobe Reader? The freely distributed Adobe Reader is widely available; more than 500 million copies have been distributed worldwide since 1993. To build a Reader plug-in, you must first apply for an Integration Key License Agreement.


Full post  

Convert Word to PDF Universal Document Converter 4.2

Convert Word to PDF

The exchange of documents in the PDF format is a sign of consideration. Con

verting documents from Microsoft Word to PDF format gives you the ability to email documents to customers in change-protected mode, to replicate presentation materials in printshops without any troubles with missing fonts or broken layouts. Plus, converting documents from Word to PDF allows you

to prepare them for archiving.

Universal Document Converter is the most complete solution for the conversion of documents into Adobe PDF or graphical files. The underlying basis of Universal Document Converter is the technology of virtual printing. As a result, converting Word to PDF format is not any more complicated than p

rinting on a desktop printer.

Play video tutorial

How to Convert Word to PDF

  1. Download and install Universal Document Converter software onto your computer.
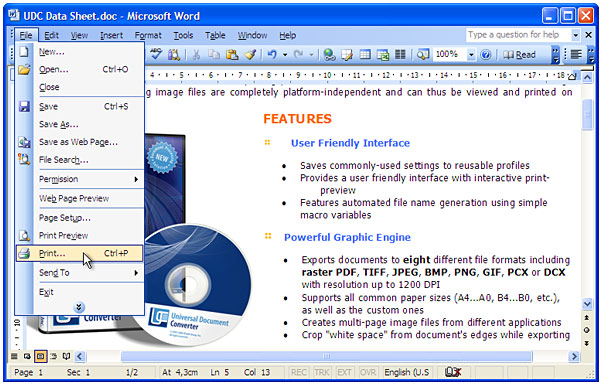
  2. Open the document in Microsoft Word and press File->Print... in application main menu.


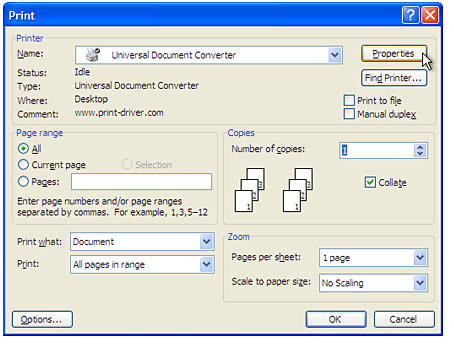
  3. Select Universal Document Converter from the printers list and press Properties button.


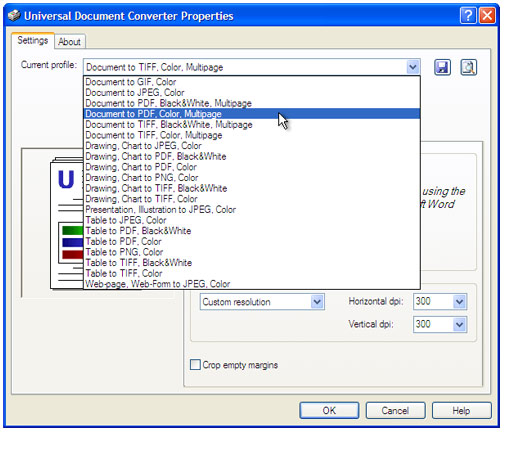
  4. Select the Document to PDF, Color, Multipage profile in the Universal Document Converter Properties window and press OK.


  5. Press OK in Microsoft Word Print dialog to start converting. When the PDF file is ready, it will be saved to the
    C:\UDC Output Files folder by default.
    Converting Word to PDF in progress.
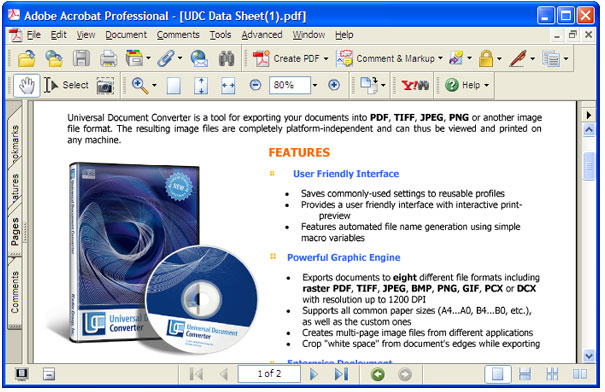
  6. Converted document will then be opened in Adobe Acrobat or another viewer associated with PDF files on your computer.

Frequently Asked Questions

Q1: I need to convert text-only documents to PDF format. How can I reduce the size of the PDF file?
A1: Please use the Document to PDF, Black&White, Multipage profile in step 4 in the instructions above.

Q2: How do I keep 100% of the quality of the presentation when I convert it to PDF?
A2: After selecting Document to PDF, Color, Multipage profile in the Printing Preferences window, please change Color Depth value to True Color (24 bpp). Plus, open the Page Setup tab in the Printing Preferences window and increase the Image Resolution setting to 600 x 600 DPI.

Q3: How to append all Word documents I have to one multipage PDF?
A3: Please open the Output tab in the Universal Document Converter Properties window. Select Append all pages to existing PDF file in Options drop down in bottom part of the window.

Q4: How can I keep the background color or background image when I convert a document from Word to PDF?
A4: Please press File-Print... in Microsoft Word main menu. In Print window press the Options... button. Enable the Background colors and images check box in the middle-right area of the window.

Q5: I need to convert daily about 150 documents from Word to PDF. How can I automate this task?
A5: PrintConductor software can print Word documents in batch mode. If you select Universal Document Converter from the printers list, PrintConductor will use it for converting documents from Word to PDF instead of printing them on desktop printer.

Q6: I need to convert Word to PDF myself using VB.NET. Do you have any examples?
A6: Yes, you can find source code examples for Visual Basic and Visual C++ in Developer Solutions section of Universal Document Converter�s site.


Convert Word to PDF


16.15 MB


System requirements

  • Microsoft Windows 98, Windows Me, Windows NT4, Windows 2000, Windows XP, Windows 2003 or Windows Vista
  • Universal Document Converter can print from 32-bit applications only
  • Universal Document Converter does not print for DOS applications
  • Intel Pentium 100 MHz or above
  • 64 MB or more RAM
  • Hard disk free space: 10 Mb for the program files, 100 Mb for output files, 100 Mb of system disk space for a swap-file


Latest release - Version 4.2 (April 29, 2008)


What's new in the current version:

  • Improved performance for heavy loads (converting thousands of documents)
  • Corrected installation under Windows Vista (32 bit edition)
  • Significantly improved the printing quality of black and white documents in fast dithering mode
  • Improved compatibility with Microsoft Excel
  • Added a list of templates for managing the name of the destination folder and converting documents
  • Added the ability to install program on computers without disk C:
  • Added a Russian version of the program and a Russian web-site
Full post  

Saturday, May 24, 2008

BitDefender Total Security 2009 - Beta 1 Test


Modules that are still in progress (to be delivered in the following beta kits):
? Online backup for Windows x64 systems
? Vulnerability scanning
? Registry control
? Wizard to create new antimalware scan tasks from basic view
? Integrated online support wizard
? Activity tab in the firewall module
? Parental – Time limiter
? History events for several modules

Known issues:
? Sometimes, on Windows Vista, BitDefender Registration Wizard starts after system restart even after the product has been registered and activated.
? Monitoring components status: - The "Stealth mode is disabled" issue can't be fixed (by default this issue is not monitored)
- The “Fix” button doesn't work on Parental Control related issues
? Settings:
- The Basic Settings


File Vault Testing:

Test case 1: - Enabling File Vault through Simple View

1. In the Basic View please go to File Manager and click the red Fix Button for the issue: "The File Vault is disabled".

2. Please verify that the general Status of the File Manager Zone has changed to Protected. Please note that the backup issues that are also a part of the File Manager are by default Not Monitored and therefore are not taken into account for the File Manager Status.

3. Please verify that the Status for file Vault is now Ok.

Test case 2: - Adding files to a new File Vault

1. Click the Add file to Vault button and verify that a wizard is displayed

2. In the first step please select the files you wish to Add to your File Vault. Please note that BitDefender will create an encrypted copy of these files into another file that will be accessible as a separate partition in Windows Explorer. This File Vault will only be accessible by the user that knows the File Vault Password.

3. After adding some files in the first Step, click Next. Be sure that in the second tep you select Create New File Vault and click Next

4. In the third step please double click the Text Box with the name: "Enter path for the File Vault" and in the next window input a file name for you vault. Select your desired Drive Letter from which you will access the encrypted files. Also input a password longer that 8 characters which you will use to access your encrypted files. In the Vault Size text box, enter the disk space you wish to allocate to the File Vault. We recommend this value to be based on what files you want to encrypt, if you want to encrypt large movie files, a 10 GB ize is recommended, if you want to encrypt documents, a 1 GB file vault would be enough. After this, click Next

5. In this step, a summary of the selected features of you File Vault will be displayed. Please observe any incorrect values the click Next

6. A windows Format Partition window will be displayed. This is used to format you new Virtual File Vault. Please select Start, and after the format is done select Close.

7. Back to the Wizard, please verify that the result was successful and click Finish. Verify in Windows Explorer that the File Vault Virtual Drive was created and your files are found there.

Test case 3: - Locking a file Vault

1. Click on Lock File Vault in Simple View and verify that a wizard appears

2. Select a vault name by clicking on its name and click next.

3. Verify that in the second step of the wizard, the described operations are correct and click next

4. In the last step verify that the operation has succeeded and verify in Windows Explorer that the File Vault Virtual Drive does not exist anymore.

Test case 4: - Mounting a File Vault from a contextual

1. After you locked a File Vault, double click the bvd file from Windows Explorer.

2. In the displayed window, input the password and click Mount

3. Check that the File Vault has been mounted on the selected Windows Drive.

IM Encryption Testing:

Test case 1: - Testing Yahoo Messenger Integration and Encryption

1. Start a yahoo instant messaging conversation between two computers that have yahoo messenger installed.

2. Observe the BitDefender icon loaded in the right left corner. Please notice that the encryption of a conversation over Yahoo Messenger is possible only if both users have BitDefender installed. If this is the case, the BitDefender icon loaded in the right left corner will have a key symbol displayed next to the BitDefender logo. This key symbol represents that you conversation is secure.

3. Start IM conversations as usual and observe if the BitDefender icon has the key symbol when you chat with another user that has BitDefender 2009 installed and if he doesn’t please click the BitDefender logo and select Invite to use encryption and observe the message that is displayed.

Test case 2: - Testing MSN Encryption and Encryption

1. Start a MSN instant messaging conversation between two computers that have yahoo messenger installed.

2. Observe the BitDefender icon loaded in the right left corner. Please notice that the encryption of a conversation over MSN is possible only if both users have BitDefender installed. If this is the case, the BitDefender icon loaded in the right left corner will have a key symbol displayed next to the BitDefender logo. This key symbol represents that you conversation is secure.

3. Start IM conversations as usual and observe if the BitDefender icon has the key symbol when you chat with another user that has BitDefender 2009 installed and if he doesn’t please click the BitDefender logo and select Invite to use encryption and observe the message that is displayed.

Home Management Testing:

Test case 1: Joining a network

1. In the Home Management Zone, click Join/Create Network.

2. Enter a password. Please note that this password will be used by anyone who wants to join your network, or add your computer to his network

3. Observe that your computer is displayed in the network graphic and has the correct name. Also please observe that when hovering your mouse over your computer in the right corner of the Security Center, information about your computer is displayed. Please check if this information is correct.

Test case 2: Managing a network

Note: This testcase applies only if your computer is part of a local network, and in this network you have access to other stations that have BitDefender 2009 installed.

1. From another station, than the one used in Test Case 1, please click Join/Create Network and input a desired password.

2. From the station used in Test Case 1, click on a Empty slot in the Network Graphic from Home Management and select Add Computer

3. Wait for the list to be populated and observe if there are any missing workstations from your network and if the workstations having BitDefender 2009 have a BitDefender icon in the list.

4. Select the workstation from the first step of this Test Case and click Add. Input the password that you defined in the first step of this test case.

5. Observe that the workstation selected at step 4 is now displayed in the Network Graphic.

6. Observe if the number of issues and other informations from this computer is displayed correctly when hovering with the mouse over the Workstation in the Network Graphic.

Test case 3: Sending tasks to managed computers

1. From the Workstation used in Test Case 1, click the can All task.

2. Select the Full system scan and click OK

3. Notice if a message box appears for each computer, tating that the task was succesfully sent.

4. Notice that the scanning task will run in backgroud and will be shown as a red icon in the systray.

5. After the scanning task is completed, right click the remote computer, enter the remote password and click Show history of this computer.

6. Observe if the remote history is displayed and double click the history event related to your scan and check out if any ecurity threats were detected during this scan.

Test case 4: Leaving a network

1. Click Leave network in the Home Management section

2. Observe that your computer will not be displayed anymore in the Network Graphic

Parental Control Testing:

Test case 1: - Enabling the types of parental control

1. In the advanced view, click the Parental Control module.

2. Observe if all the users present on your computer are displayed.

3. Double-click a user on which you want to test Parental Control and enable Web Control, Application control, Web time limiter.

4. Observe if the issue from Security Center for that user, has been fixed

Test case 2: - Checking web control functionality

1. Click the + button in the Web Tab and add a site that you wish to block.

2. After this check that on the Windows account that was selected, the blocked website is not loaded in your favorite web-browser. Please take into consideration, that using the standard settings for your browser, already visited websites are loaded from your local cache and therefore there will be no http traffic that can be filtered by Parental Control. In order to avoid this, we recommend clearing your web-browser cache before stating to test Parental Control.

Test case 3: Checking Applications Control Functionality

1. Click the + button in the Applications Tab and add a local executable file that you wish to prevent from running.

2. After this, check that on the Windows Account that was selected, when trying to run the blocked program, a BitDefender Alert will appear stating that the application is blocked.

Test case 4: Checking Time Limiter Functionality

1. In the Time Limiter Tab, using you mouse, select a time interval in which you want the internet access to be blocked.

2. Please verify that, in the selected Windows account, during that time interval, you can’t access any webpage or connect to the internet using your favorite instant messaging software.


bitdefender totalsecurity 2009_32b-BETA1

72.9 MB


bitdefender totalsecurity 2009_64b-BETA1


83.9 MB


Special Thanks:
Mahdi(Patron)
Full post  

Flash Player 10.0.1.218 Beta (Non-IE)

Download Flash Player 10.0.1.218 Beta (Non-IE)
Adobe Flash Player is the high performance, lightweight, highly expressive client runtime that delivers powerful and consistent user experiences across major operating systems, browsers, mobile phones and devices.

Installed on over 750 million Internet-connected desktops and mobile devices, Flash Player enables organizations and individuals to build and deliver great digital experiences to their end users.

  • Immersive experiences with Flash video, content and applications with full-screen mode.
  • Low-bandwidth, high-quality video with advanced compression technology.
  • High-fidelity text using the advanced text rendering engine.
  • Real-time dynamic effects with filters for Blur, DropShadow, Glow, Bevel, Gradient Glow, Gradient Bevel, Displacement Map, Convolution, and Color Matrix.
  • Innovative media compositions with 8-bit video alpha channels.
  • Blend modes, radial gradient, and stroke enhancements.
  • Additional image formats: GIF, Progressive JPEG, and PNG.

This download is the standalone installer for Firefox, Opera and other Gecko-based browsers.

Old versions of the Flash player can be downloaded from Adobe at http://www.adobe.com/go/tn_14266


Full post  

Followers

HMB™ Softwares © 2008-2009. Template by HMB™.

▲TOP